Communication Scheduler
R900® cellular endpoints are delivered with a predefined reading communication schedule set up at the factory. Each reading is scheduled to occur within a one-hour time period. The Communication Scheduler helps utilities review schedule status for supported R900 Cellular Endpoints and manage schedule changes when those endpoints are eligible.
This feature allows you to:
- Review the current call-in schedule assigned to an endpoint.
- Confirm whether the endpoint is successfully using the selected schedule.
- Create, update, and reassign custom schedules when the endpoint is eligible.
- Understand why an endpoint is temporarily unavailable for schedule changes.
- Use page-level statuses and tooltips to decide whether to wait, retry, update firmware, or contact support.
Communication Scheduler is available only for supported R900 Cellular Endpoints. Utility Administrators can edit schedules; all other roles have view-only access.
Communication Scheduler is available to R900 Cellular Endpoints with IDs in the following ranges:
- 220000000 to 229999999.
- 310000000 to 319999999.
- 320000000 to 349999999.
- 500050000 to 599999999.

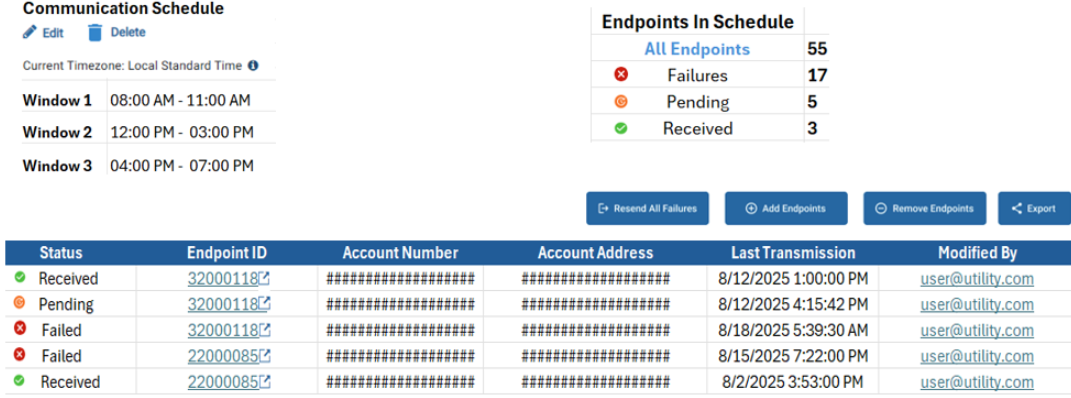
Example Schedules
The default communications settings include three daily transmissions, every 8 hours, in the 24-hour period beginning at midnight.

This default schedule gives users a baseline schedule to review before deciding whether a different transmission timing is needed. Some billing or operational scenarios may require a custom transmission schedule instead of the factory one. If a custom schedule is needed, Neptune 360 allows the change only when the selected endpoint is currently eligible for scheduling.
With the correct permissions, you can override the predefined schedule to accommodate your specific utility's needs and billing schedule and create a custom schedule.

The default schedule includes all R900 cellular devices that the utility purchased / claimed. This feature is not available to any other type of endpoint (R450™, CMIU, R900®, LoRaWAN®).
The following guidelines apply to any communication schedule changes:
- On the Summary page, the endpoint must be in Ready Status.
- You cannot increase or decrease the number of readings in any given 24-hour period, you can only change the timing of the readings.
- You must allot at least one hour between readings.
- If you reschedule a reading and then delete the rescheduled reading, the endpoint resumes the default schedule and shows the reason the endpoint is unavailable to reschedule.
- On a custom schedule page, the endpoint must be in a schedulable status, such as Received.
- Review the current schedule assignment for eligible R900 Cellular Endpoints.
- Decide whether the default midnight-and-every-8-hours pattern meets operational needs.
- Attempt to add endpoints, reassign endpoints, create schedules, or change an existing custom schedule.
- Complete the change for eligible endpoints or review the unavailable reason for endpoints that are currently blocked.
What You Should Expect
- Page-level statuses help you review the current state of the schedule assignment before taking action.
- Ready on the Summary page and Received on a Custom Schedule page both represent the normal successful state.
- Pending means a schedule change request is still in flight.
- Errors mean the system failed to add the endpoint to the selected schedule.
- All supported cellular endpoints begin with the default 3-times-daily schedule in a 24-hour period.
- Customers can adjust the default transmission windows when scheduling is allowed.
- Not every visible endpoint can be scheduled at the same time.
- Readiness gating determines which endpoints are eligible for schedule changes.
- If an endpoint is blocked, the tooltip explains the reason.
- Bulk actions affect only eligible endpoints.
When you try to add endpoints, create schedules, reassign endpoints, or update an existing schedule, Neptune 360 evaluates readiness conditions for each endpoint. This readiness gating controls whether the endpoint can be selected for the following actions:
- Add endpoints to an existing custom schedule.
- Create schedules.
- Re-Assign endpoints from one schedule to another.
- Change an existing schedule’s call-in details or naming conventions.
You can select an endpoint only when no other operations or blocking conditions are using it.
Page-Level Statuses
The Communication Scheduler pages use page-level statuses to show whether an endpoint is already using the selected schedule or whether a change request is still in progress.
| Page | Status | Description |
|---|---|---|
| Summary | Ready | The endpoint is using the selected schedule. |
| Summary | Pending | A schedule change request is in flight. |
| Summary | Errors | The endpoint failed to be added to the selected schedule. |
| Custom Schedule | Received | Equivalent to Ready on the Summary page; the endpoint is using the selected schedule. |
| Custom Schedule | Pending | A schedule change request is in flight. |
| Custom Schedule | Errors | The endpoint failed to be added to the selected schedule. |
| Custom Schedule | Call Support | scheduling is blocked for a support-related reason that requires Neptune support intervention. |
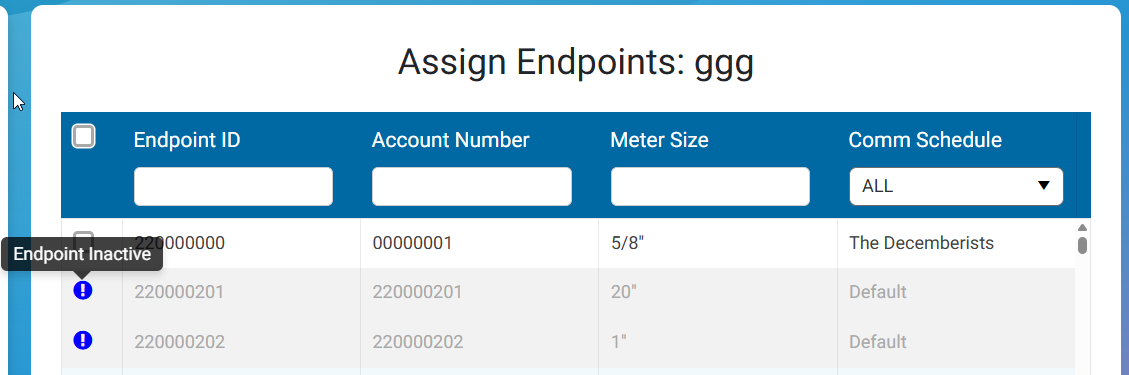
All cellular endpoints that the utility owns are visible in the grid, but some may not allow scheduling actions. When that happens, Neptune 360 disables the checkbox, visually de-emphasizes the row, and provides a hover-over tooltip above the info icon ( ) that provides explanations as to why scheduling is unavailable.
| Reason | Description |
|---|---|
| Pending valve operations | The connected endpoint is currently being used for MACH 10v valve operations. |
| Firmware update in progress | Neptune support team is currently updating the endpoint firmware. |
| Firmware update required | The endpoint firmware must be updated before scheduling is allowed. |
| Endpoint inactive | The endpoint has not communicated with Neptune 360 in at least 27 hours. |
| Call Support | Scheduling is blocked for a support-related reason. |
| Multiple | Two or more blocking conditions apply to the same endpoint. |
Selecting all endpoints applies only to eligible endpoints. Unavailable endpoints remain visible but are not selected.
What You Can See and Do in This Window
Click a link to display the related information or step-by-step procedure.
Action Options – –
–
–
–
–
Filter the Communication Schedule Grid
You can filter the communication schedule grid to display data for:
- All Endpoints – endpoints claimed and associated with the current schedule that is selected.
- Ready – endpoint received, acknowledged, and applied to the new communication schedule.
- Firmware Required – endpoint requires a firmware update before the Configurable Reporting Windows feature becomes available. Contact Neptune customer support for assistance.
- Pending – the system is processing the new communication schedule.
- Failures – endpoint failed to apply the new communication schedule. Possible causes include server communication errors, incorrect endpoint firmware, loss of RF (radio frequency) infrastructure, low battery, or an object blocks the meter box.
The following table defines the data in the schedule grid.
| Column | Description |
|---|---|
| Account Number | Account number for the endpoint. |
| Account Address | Physical address fore the account. |
| Endpoint ID | ID for the endpoint listed in the grid. This ID is a link that displays the endpoint on the Customer Inquiry page. |
| Last Transmission | Date and time the endpoint last sent a reading to the system, in YYYY-MM-DD (T) HH:MM:SS format (in the time format set for the utility-hour time). |
| Modified By | Email address of the person who updated or created the schedule. |
| Status | Endpoint status (Received, Pending, Errors). |
Create a New Schedule
If you have the proper permission, you can create a new custom communication schedule for the endpoints in your network.
- On the Neptune 360 navigation panel, select Comms Scheduler under Endpoint Management.
- Click Create New Schedule.
The Configurable Communication Timing Windows is displayed.
- In the Enter Communication Window Name field, type the new schedule name.
- Move the sliders to set up to four new reading times.
- Click Save Changes.
- Verify the new schedule and click Confirm Changes or click Confirm and Add Endpoints if you want to assign endpoints to the schedule.
Assign Endpoints to a Schedule
When you opt to add endpoints to a new schedule you create, you assign endpoints to the new schedule. You can assign all currently unassigned endpoints, or assign individual endpoints. In the Assign Endpoints grid, you can search endpoints by endpoint ID, account number, or meter size.

- On the Neptune 360 navigation panel, select Comms Scheduler under Endpoint Management.
- Do one of the following. If you want to:
- Assign endpoints at the time you create a new schedule, create the new schedule, and then click Confirm and Add Endpoints when you confirm the schedule addition.
- Assign endpoints to an existing schedule, select the schedule and then click Add Endpoints.
- Select the checkbox for each endpoint you want to add to the schedule, or select the checkbox for all endpoints.
When users choose the select all checkboxes in the column titles header on the grid, Neptune 360 selects only the endpoints that are eligible to assign to a schedule. As a result, users may see rows in the grid that remain unselected This is expected when those rows are blocked by status or readiness conditions. If applicable clicking the tooltip shows the conditions why the endpoint may not be ready to assign to a schedule.
- Click Assign.
- Click Yes to confirm you want to assign the endpoints.
Actions do not always take effect immediately. In most cases, Neptune 360 applies the requested schedule update when the endpoint next connects and confirms the change. Until that confirmation is received, the endpoint may continue to show a Pending or Errors status.
- Before selecting an action, review the endpoint status shown on the page.
- When an endpoint previously failed to receive and apply the selected schedule, click Retry All Errors .
- When additional eligible endpoints should be assigned to the current custom schedule, click Add Endpoints.
- When you want to remove an endpoint from the current schedule and place it on a different one, click Re-Assign Endpoints.
- If an endpoint is unavailable for an action, Neptune 360 keeps the endpoint visible and explains why the action cannot be completed
The Custom Schedule page can display action buttons that help you manage endpoints already associated with the selected schedule. These actions are intended to help you resolve schedule issues or move endpoints as needed.
| Retry All Errors | Use to resubmit the selected schedule for endpoints that are currently in an Error status. This action is useful when an endpoint did not successfully receive or apply the schedule during an earlier attempt. After retrying, Neptune 360 continues processing the request until the endpoint reconnects and the schedule update is confirmed. |
| Add Endpoints | Use to assign additional eligible cellular endpoints to the current custom schedule. Neptune 360 displays all cellular endpoints that the utility owns (claimed), but note that not all visible endpoints are available to be added to a given schedule. If an endpoint is not currently eligible for scheduling, Neptune 360 prevents the selection and provides a message explaining why the endpoint is unavailable. |
| Re-Assign Endpoints | Use to move one or more endpoints from their current schedule to a different schedule. This action removes the selected endpoints from the current schedule and applies a different schedule instead. You can reassign only endpoints that are currently eligible and selectable for scheduling. |
Retry All Errors
Endpoints may fail to apply a communication schedule for various reasons. You can retry all errors to allow the schedule to be applied. You may be able to correct any obvious reasons for the failures before reapplying the schedule.
- On the Neptune 360 navigation panel, select Comms Scheduler under Endpoint Management.
- On the Summary panel, click the schedule you want to display.
- In the Endpoints in Schedule panel, click Errors to display the grid of the endpoints that failed to apply the schedule.
- Click Retry All Errors.
- Review the Failures grid to determine if any endpoint failures now have the schedule applied.
Re-Assign Endpoints to a Schedule
With the proper permission, you can re-assign one or more endpoints to a different schedule, or back to the default schedule.
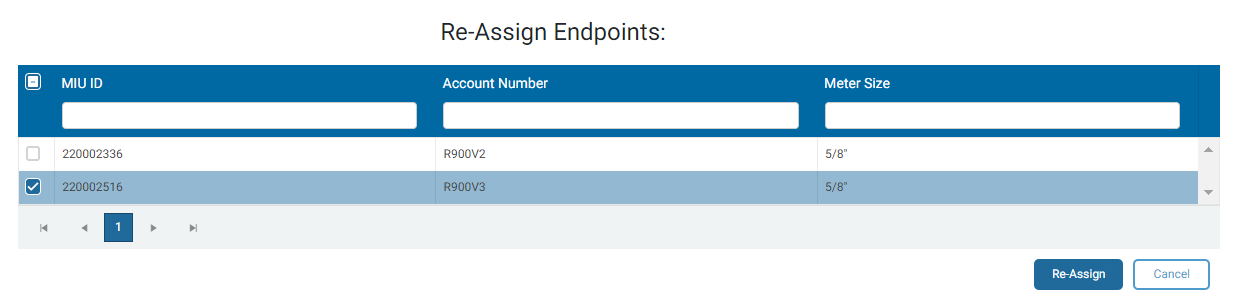
- On the Neptune 360 navigation panel, select Comms Scheduler under Endpoint Management.
- On the Summary panel, click the schedule for which you want to re-assign endpoints.
- Click Re-Assign Endpoints.
- Select the Endpoints you want to re-assign.
- Click Re-Assign.
- Select the schedule to which you want to re-assign the endpoints.
- Click Confirm Changes to complete the reassignment.
Display an Endpoint on the Customer Inquiry Page
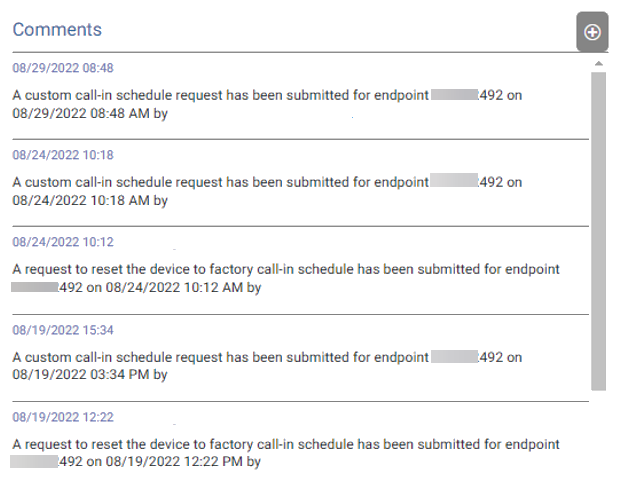
The schedule grid includes a column for Endpoint ID. This ID is a link you can click to display the endpoint and reading information on the Customer Inquiry page. If you or another user made any schedule changes to the specific endpoint, the changes display in the Comments section on the Customer Inquiry page.
Edit a Schedule (Administrator Only)
With the proper permission, you can edit the name of a communication schedule or edit the schedule itself.
- On the Neptune 360 navigation panel, select Comms Scheduler under Endpoint Management.
- On the Summary panel, click the schedule you want to edit.
- In the schedule pane, select the schedule you want to edit.
- Under the Communication Schedule heading, click Edit.
- Move the sliders to change one or more reading times.
- Click Schedule Update.
- Verify the new schedule and click Confirm Changes.
Delete a Schedule (Administrator Only)
With the proper permission, you can delete a communication schedule. When you delete a schedule, the endpoints revert to the default schedule.
- On the Neptune 360 navigation panel, select Comms Scheduler under Endpoint Management.
- On the Summary panel, click the schedule you want to delete.
- In the Communication Schedule heading, click Delete.
- Verify the schedule is the one you want to delete and click Confirm Changes to delete the schedule.
When a cellular endpoint connected to a MACH 10v valve assembly is swiped using a magnet (mag-swipe), the endpoint temporarily reverts back to the default / factory communication schedule. If the endpoint was using a custom or accelerated schedule, Neptune 360 typically restores the appropriate schedule automatically after the endpoint reconnects. During that time, users may notice that the endpoint does not immediately follow its expected call-in timing and you may need to recreate the custom communications schedule on this endpoint as required.
Neptune 360 does not allow valve command submissions if there is a pending schedule change. Likewise, the system also does not allow a schedule change submission if there is a pending valve command. Schedule changes take precedence over valve commands.
- If a valve command is already pending when the endpoint is mag-swiped, Neptune 360 may first restore the appropriate schedule (default or custom) and then complete the pending valve action during a subsequent successful call-in. As a result, valve activity such as Open, Close, or restricted-flow operation may not occur immediately after the mag-swipe.
- If the endpoint is already using the default communication schedule, mag-swiping does not change the schedule. In that case, the endpoint continues using its normal default transmission and valve timing.
- When Accelerated Schedule is active, mag-swiping can temporarily affect the timing of expected follow-up activity until Neptune 360 restores the correct schedule. Continue to monitor command status in Neptune 360 and allow for the next successful endpoint call-in before assuming that a pending valve command has failed.
Why can’t I select an endpoint?
- Endpoint is still Pending.
- Endpoint is in an Error state.
- A valve-related operation is still in progress.
- A firmware update is in progress.
- A firmware update is required before scheduling is allowed.
- The endpoint is inactive.
- Scheduling is blocked for a support-related reason.
Review the endpoint tooltip for the most specific explanation.
Why is the checkbox disabled?
A disabled checkbox means the endpoint is not currently eligible for scheduling. The row remains visible so users can review its status and the reason scheduling is unavailable.
Why did Select All skip some endpoints?
The Select All button applies only to eligible endpoints. Rows with blocked statuses or readiness conditions are excluded automatically.
